Creating the Perfect Ergonomic Home Office: Tips for a Pain-Free Workspace

In the modern professional landscape, the home office has transitioned from a temporary setup to a permanent fixture in our lives. However, many of us overlook the physical toll that a poorly designed workspace can take on our bodies. Incorrect posture and improper furniture alignment are leading causes of chronic neck pain, backaches, and general physical fatigue.

To help you stay productive and healthy, here is a comprehensive guide to setting up an ergonomic home office that prioritizes your well-being.

1. Optimize Your Desk Space

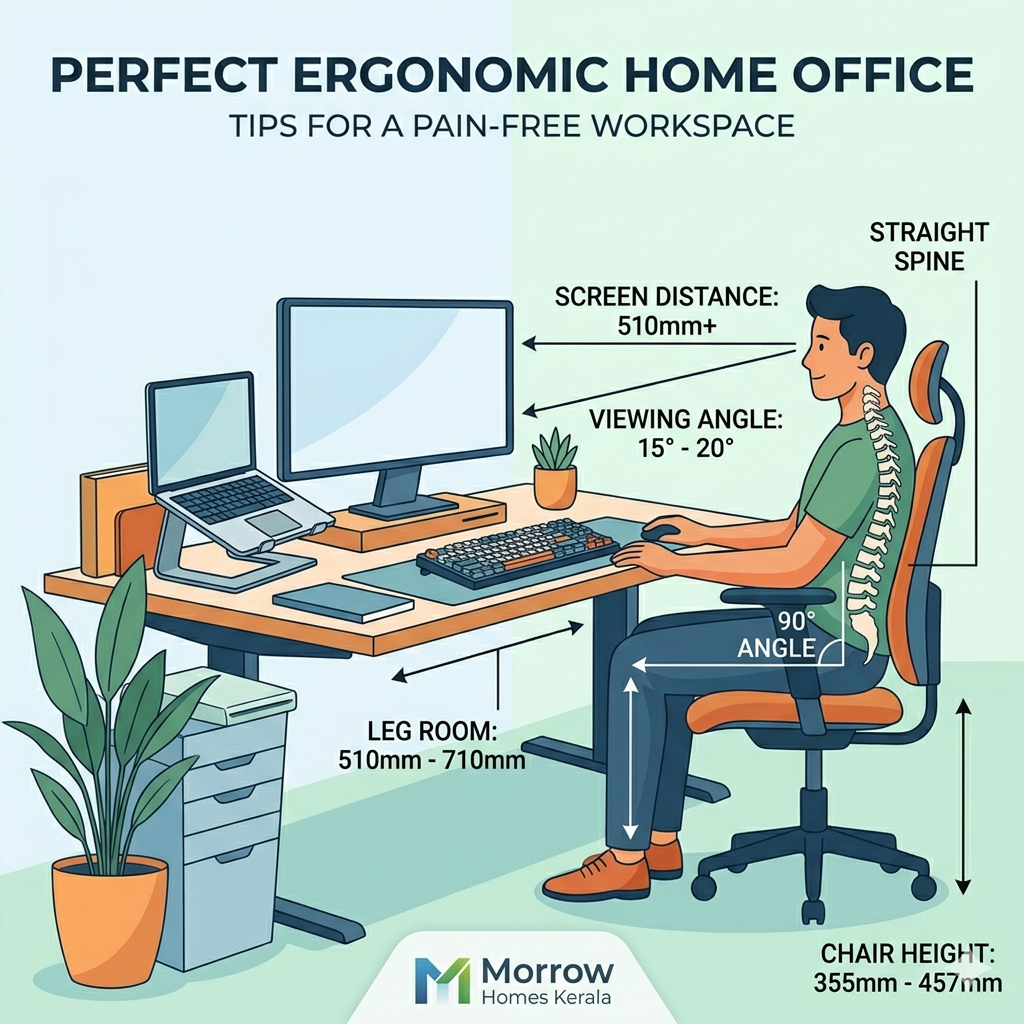
The foundation of a good workstation is having enough room to move. One of the most common mistakes is a cramped desk area that restricts leg movement. To ensure comfort, there should be a clear space of 510 mm to 710 mm beneath your desk.This allows you to stretch and position your legs naturally, preventing stiffness during long hours of work.

2. Perfect Your Seating Height

Your chair is perhaps the most critical element of your setup. A chair that is too high or too low can put undue pressure on your spine and thighs. Ideally, your chair height should be adjusted between 355 mm and 457 mm. When sitting, pay close attention to your body’s angles: your hips and knees should remain at a 90-degree angle. This posture supports the natural curve of your spine and promotes better circulation.

3. Maintain Spinal Alignment

It is easy to find yourself slouching as the day progresses, but keeping your spine straight is essential for long-term health. Avoid leaning forward or hunching over your laptop. Sitting upright not only prevents back pain but also improves your focus and breathing.

4. Screen Placement and Eye Health

Eye strain is a frequent complaint for those working digitally. To protect your vision, the distance between your eyes and the screen should be approximately one arm’s length, or at least 510 mm.

Furthermore, the angle at which you view your monitor matters. Positioning your screen so that your viewing angle is between 15 to 20 degrees is considered the most suitable for reducing neck strain.  This ensures you aren’t constantly looking too far up or down, which can lead to cervical discomfort.

Conclusion

Investing a little time into the ergonomics of your home office can yield massive returns in terms of health and productivity. By following these specific measurements and posture tips, you can transform your workspace into a sanctuary of efficiency rather than a source of physical stress.

Remember, a healthy body is the most important tool in your professional toolkit. Start making these adjustments today to ensure a more comfortable and sustainable work-from-home experience.

Watch More: https://youtube.com/shorts/hHjqDxvnwWI?si=h2yOlizAfWlikmyh

Essential Measurements for a Stunning and Functional Living Room

The living room is the heart of every home—a space where families gather, guests are entertained, and memories are made. However, a common mistake in home design is focusing solely on aesthetics while overlooking the science of ergonomics. Even the most expensive furniture can feel awkward if the spacing is off. To help you create a space that is both beautiful and comfortable, here are the essential measurements and layout tips for a perfect living room.

1. The Ideal Distance Between the Sofa and TV

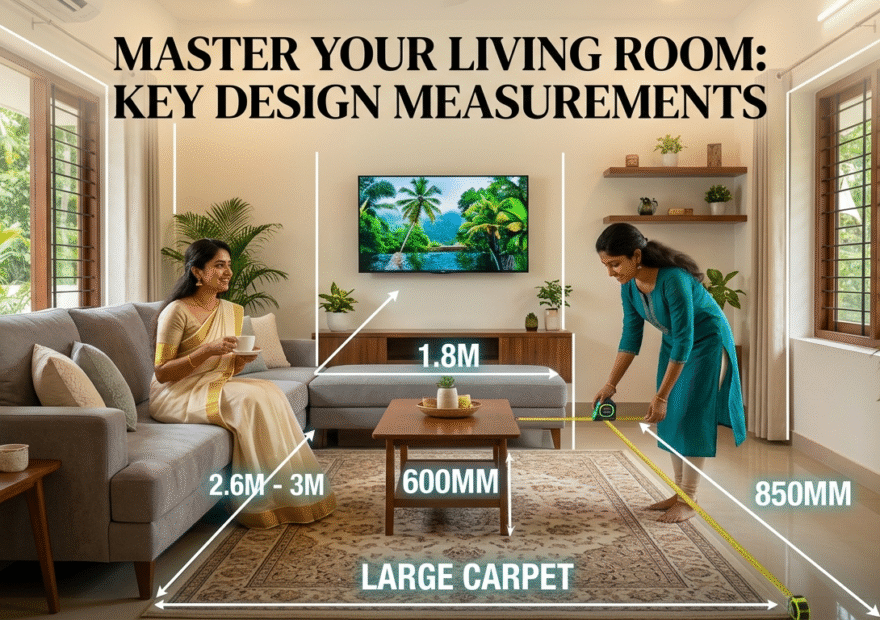
One of the most important aspects of living room comfort is the viewing distance. If the sofa is too close, it can cause eye strain; if it’s too far, the cinematic experience is lost. A professional standard to follow is maintaining a distance of approximately 1.8 meters from the TV unit to the sofa. This provides a balanced field of vision and ensures that the screen remains the focal point without overwhelming the seating area [00:00].

2. Ensuring Seamless Traffic Flow

A well-designed room should never feel like an obstacle course. Whether you are carrying a tray of tea or simply moving through the house, “clearance” is key. It is highly recommended to leave at least 850 millimeters of walking space around furniture to ensure smooth movement within the room .

Additionally, pay close attention to the gap between your sofa and the coffee table. To prevent bumped shins while still keeping your drink within reach, aim for a minimum of 600 millimeters of space between the two .

3. Creating the Perfect Conversation Circle

Socializing is the primary function of a living room. If seats are spread too far apart, people end up shouting; too close, and it feels cramped. For a natural and comfortable conversation flow, position your primary seating within a range of 2.6 to 3 meters . This distance allows for intimate communication while maintaining a sense of personal space.

4. The Secret to Choosing the Right Carpet

The rug you choose can either “anchor” the room or make it look disjointed. A common design error is using a carpet that is too small for the space. Tiny rugs can make a large room look narrow and cluttered.

Instead, opt for a larger rug that allows at least the front legs of the sofa to rest upon it. Using a generous carpet that accommodates the furniture legs creates an illusion of a larger, more grand space, adding a touch of elegance and cohesion to the entire interior.

Conclusion

Designing a living room is about finding the perfect harmony between style and utility. By following these precise measurements—from the 1.8-meter TV distance to the 850mm walking paths—you can transform your home into a professional-grade living space. Remember, a room that is measured correctly doesn’t just look better; it feels better to live in.

For more expert home design and architectural tips, stay tuned for our latest updates and guides!

Watch the video: https://youtube.com/shorts/gXa3dXdW5k4?si=DxoLTVatGm_CIw2D

Essential Kitchen Design Tips: Avoiding Common Layout Mistakes for Your Dream Home

Designing a kitchen is one of the most critical aspects of building a home in Kerala. It is the heart of the household, where functionality must meet aesthetics. However, many homeowners and builders often fall into common traps that turn a beautiful kitchen into an impractical workspace.

Drawing insights from modern architectural standards, let’s look at how to avoid frequent kitchen design errors to ensure your space is both comfortable and efficient.

The Importance of the Kitchen Island Clearance

One of the most common mistakes in contemporary kitchen design involves the placement of the kitchen island. While an island provides extra counter space and a modern look, it can become an obstacle if not planned correctly.

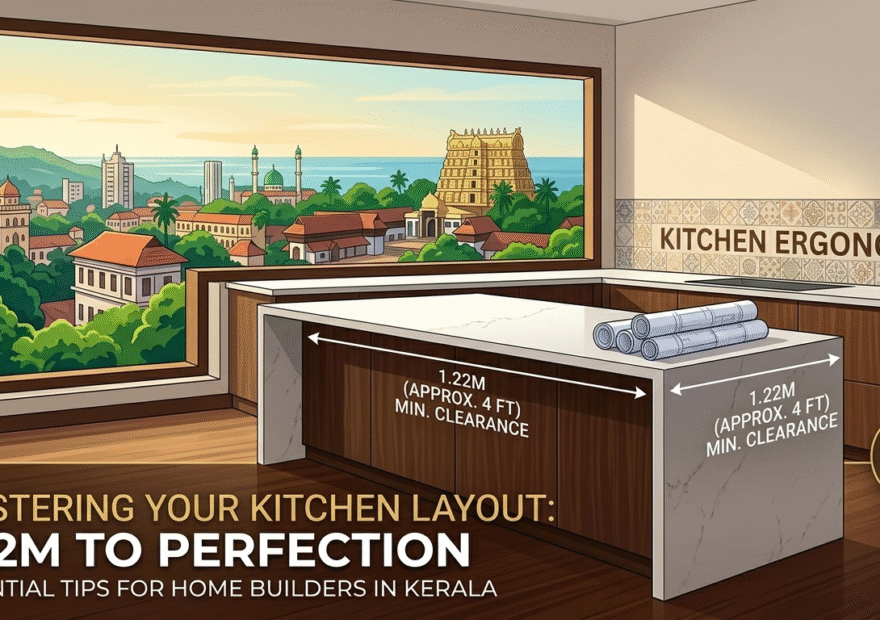
A major error is leaving insufficient space between the island and the main kitchen counters. While some suggest a gap of 1.01 meters, this is often inadequate for a busy kitchen . For a truly functional space where two people can move past each other comfortably or where cabinet doors and appliances can open fully without obstruction, a minimum distance of 1.22 meters (approx. 4 feet) is highly recommended . This ensures that your movements are not restricted during peak cooking hours.

Optimizing the Kitchen Work Triangle

The “Work Triangle”—the path between the sink, the cooktop (hob), and the refrigerator—is the foundation of kitchen ergonomics. A frequent mistake is placing these elements in an illogical sequence or too far apart.

For instance, placing the sink at a great distance from the refrigerator makes the process of cleaning vegetables and prepping food incredibly tedious. Similarly, the hob should be positioned strategically so that it doesn’t interrupt the natural flow of movement. If these components are placed in the wrong order, you end up walking unnecessary laps around your kitchen, leading to fatigue and inefficiency.

Practical Tips for Kerala Homes

In the context of Kerala architecture, where kitchens often handle heavy-duty cooking, these measurements and placements are even more vital.

  1. Prioritize Flow: Ensure that the path from the fridge to the sink, and then to the stove, is unobstructed.

  2. Measure Twice: Before installing fixed islands, use tape on the floor to visualize the 1.22-meter clearance. Ensure you have enough “butt room” to work at the counter while someone else passes behind you.

  3. Lighting and Ventilation: While layout is key, remember that proper placement of the hob near ventilation is essential for Kerala’s spice-rich cooking style.

Conclusion

A well-designed kitchen is not just about expensive cabinetry or granite countertops; it’s about the science of space. By avoiding cramped island clearances and ensuring a logical work triangle, you can create a kitchen that is a joy to work in.

If you are planning your home construction in Trivandrum or across Kerala, paying attention to these small technical details during the design phase will save you years of inconvenience.

For more expert tips on home construction and architectural design, keeping up with modern standards and local expertise is the best way to ensure your dream home is perfect in every detail.

Watch the full tip here: https://youtube.com/shorts/tRzYhkm7i9s

Choosing the Perfect Bed: A Complete Guide to Bed Sizes for Your Bedroom

When designing a bedroom, the centerpiece is—without a doubt—the bed. However, beyond just comfort, the physical size of your bed plays a critical role in the functionality and “flow” of your room. Choosing the wrong size can make a spacious room feel cluttered or a compact room feel uncomfortably cramped.

Based on insights from industry experts like Morrow Homes, understanding the standard dimensions of beds is the first step toward creating a balanced living space. Whether you are renovating your home or planning an interior layout, here is a guide to choosing the right mattress size for your needs.

Common Bed Sizes and Their Dimensions

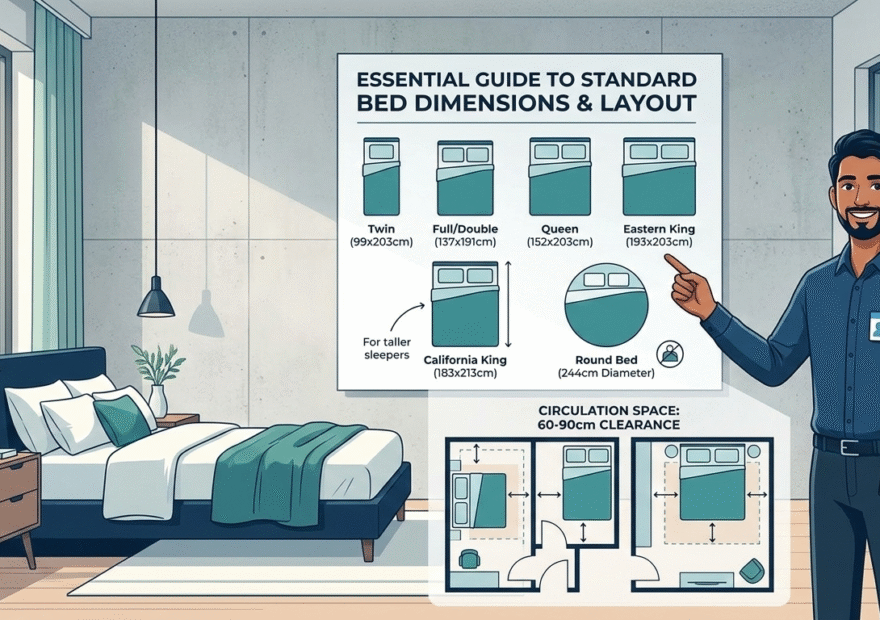
1. Twin Bed (99/203 cm) The twin bed is the most efficient choice for small bedrooms, guest rooms, or children’s rooms. Its slim profile allows for more floor space, making it ideal for compact living environments where every square centimeter counts.

2. Full/Double Bed (137/191 cm) This size offers a balance between space-saving and comfort for a single sleeper who prefers extra room, or for two people who need to be mindful of the room’s total square footage.

3. Queen Bed (152/203 cm) The Queen is arguably the most popular choice for couples. It provides a generous amount of width while still fitting comfortably in standard-sized primary bedrooms .

4. King/Eastern King Bed (193/203 cm) If luxury and maximum space are your priorities, the Eastern King is the way to go. Known for its expansive surface area, it is perfect for larger bedrooms where you want to emphasize comfort and indulgence.

Specialty and Unique Designs

5. Round Bed (244 cm Diameter) For those who want a unique, aesthetic statement piece, the round bed is an eye-catching option. However, as noted in recent design tips, while it looks visually stunning in a modern bedroom, practical maintenance can be a challenge. Finding fitted bedsheets or bedding that fits the circular shape can be difficult compared to standard rectangular beds.

6. California King Bed (183/213 cm) Taller sleepers often struggle with feet hanging off the edge of standard beds. The California King is the ultimate solution. While it is slightly narrower than the Eastern King, it compensates with significant extra length, ensuring that taller individuals can sleep soundly without compromise.

Why Measurements Matter

Before you purchase, consider the “circulation space”—the area left to walk around the bed. A general rule of thumb is to allow at least 60 to 90 centimeters of clearance on all sides of the bed to ensure the room doesn’t feel suffocating.

By measuring your room and selecting the appropriate bed type, you ensure that your bedroom remains a sanctuary of relaxation. For more tips on architectural planning and home design, stay tuned to professional home-building resources .

For more details watch the video here: https://www.youtube.com/shorts/yvqIMztZWfY

Mastering Your Home’s Electrical Layout: A Guide to Perfect Switch and Socket Placement

When building or renovating a home, it is easy to get caught up in the aesthetics—the flooring, paint colors, and cabinetry. However, the true functionality of your living space often comes down to the details you might overlook until it’s too late: the placement of your electrical switches and sockets.

Proper electrical planning is not just about convenience; it is a critical safety measure that ensures your home runs smoothly. In a recent video from Morrow Homes, experts shared essential tips for optimizing these placements to enhance both utility and safety.

The Kitchen: Prioritizing Convenience

The kitchen is the heart of the home and, naturally, the most equipment-heavy room. To ensure that your appliances—like mixers, toasters, and air fryers—are easy to use without tangled cords cluttering your workspace, pay close attention to your countertop sockets. The recommended height is at least 150mm above the countertop]. This specific elevation keeps sockets accessible while preventing them from being too close to the surface, where spills or moisture could pose a risk.

The Bedroom: Designed for Comfort

In the bedroom, the goal is effortless comfort. Your main switchboards should ideally be installed at a height of 1300mm from the floor. When it comes to the bedside, positioning your sockets near your nightstand at a height of 700mm is ideal. This placement allows you to charge your phone or plug in a lamp without needing to reach behind heavy furniture or scramble on the floor.

Safety and Aesthetics: The “Golden Rules”

Safety is paramount when mapping out your electrical points. A crucial rule often missed during construction is maintaining distance from door frames. You should always ensure there is a minimum gap of 150mm between a door frame and your switchboard . This not only adheres to safety standards but also prevents the switch from being awkwardly hidden behind the door when it is opened.

Finally, if you want a clean, minimalist look for your living room, consider the “hidden” approach for your entertainment area. By placing the primary TV sockets behind the television unit, you can eliminate unsightly wire tangles. These should be set between 1.2 meters to 1.3 meters from the floor, while auxiliary switches for the unit can be placed at a height of 500mm.

Final Thoughts

A well-planned home is one that anticipates your needs before you realize them. By taking the time to mark these heights during the construction phase, you save yourself the frustration of poorly placed outlets and ensure your home remains both functional and visually seamless.

For more expert advice on home construction and interior planning, follow Morrow Homes.

Master the Art of Bedroom Design: Key Measurements for a Perfect Sanctuary

Creating a bedroom that is both aesthetically pleasing and highly functional requires more than just picking out the right furniture. True comfort lies in the details—specifically, the measurements. Whether you are renovating your home or designing a new one, following standard spatial guidelines ensures your room feels balanced and spacious.

Based on expert advice from Morrow Homes, here is a comprehensive guide to the essential measurements you need to transform your bedroom into a comfortable retreat.


1. Finding the Ideal Bed Height

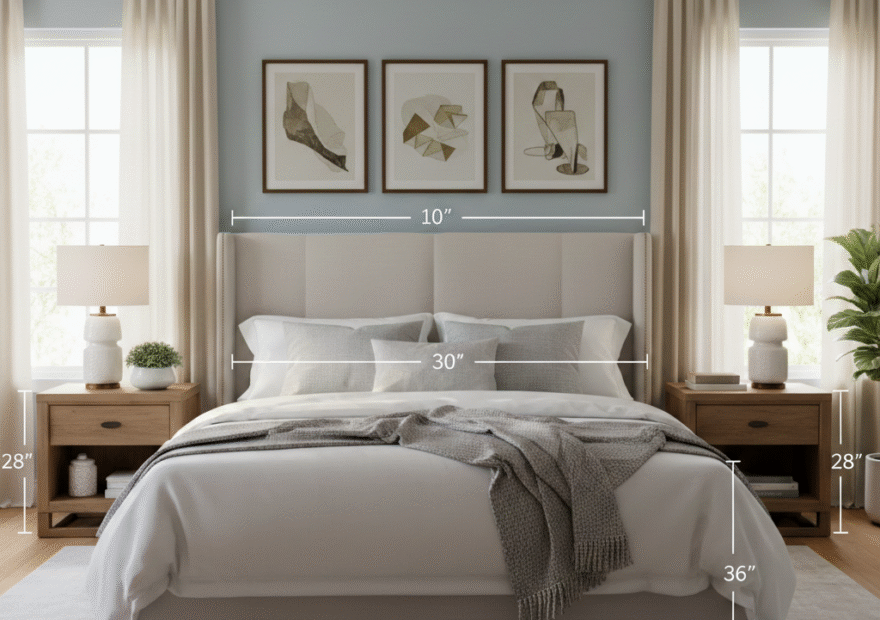
The centerpiece of any bedroom is, of course, the bed. To ensure ease of use, a standard bed should have a height of approximately 25 inches . This height allows most people to sit comfortably on the edge of the bed with their feet flat on the floor, making it easier to get in and out of bed every day.

2. Prioritizing Traffic Flow

One of the most common mistakes in interior design is overcrowding the room. To walk smoothly around your bed without feeling cramped, you should leave at least 36 inches of clearance space on all sides . This “breathing room” is essential for a stress-free environment and allows for easy access to wardrobes or balconies.

3. The Perfect Headboard and Side Table

Your headboard serves as both a functional support and a visual focal point. For a look that combines beauty with comfort, aim for a headboard height of about 30 inches above the mattress .

To complement the bed, your side tables should be at a height that makes reaching for a lamp or a book effortless. A height of 28 inches for side tables is generally considered the “sweet spot” for ergonomic comfort.

4. Enhancing Windows with Curtain Placement

If you want your bedroom to look larger and more elegant, pay close attention to your curtain rods. Instead of placing the rod directly on the window frame, install it approximately 5 inches above the frame. This simple trick draws the eye upward, giving the illusion of taller windows and higher ceilings, which adds a touch of grandeur to the space.

5. Balancing Wall Decor

Decorating the wall behind your bed adds personality, but placement is key to maintaining a “balanced look.” If you are hanging paintings or wall art, ensure there is a gap of about 10 inches above the headboard before the artwork begins . This prevents the wall from looking cluttered and ensures the proportions of the room remain harmonious.


Conclusion

Designing a bedroom is a blend of art and science. By sticking to these specific measurements—from the 36-inch walking space to the 5-inch elevation of your curtain rods—you can create a space that feels professionally designed and perfectly tailored to your needs.

For more expert tips on home transformation and interior design in Kerala, stay tuned to Morrow Homes.

Watch the full tip here: Morrow Tip – Bedroom Design

Illuminating Your Sanctuary: Why the Right Bedroom Lighting Matters

Your bedroom is more than just a place to sleep; it is your personal sanctuary, a space designed for relaxation, reflection, and rejuvenation. While we often spend hours picking out the perfect mattress or the softest linens, one of the most critical elements of bedroom design is frequently overlooked: lighting.

In a recent expert tip from Morrow Homes, a leading architectural firm in Kerala, the importance of Color Temperature (measured in Kelvin) was highlighted as a deciding factor in sleep quality and mental well-being. If you’ve been feeling restless or finding it hard to “switch off” at night, the culprit might be right above your head.

The Science of Light and Sleep

We  points out a common mistake many homeowners make: using high-intensity lights ranging from 4000K to 5000K in the bedroom These temperatures produce a “cool white” or “daylight” effect. While these are excellent for offices, kitchens, or workspaces where alertness is required, they are detrimental to a bedroom environment.

Cooler blue-toned lights suppress the production of melatonin, the hormone responsible for regulating your sleep-wake cycle. When your brain is exposed to 5000K lighting late at night, it receives a signal that it is still daytime, making it significantly harder to fall into a deep, restful slumber.

The Golden Rule: 2700K to 3000K

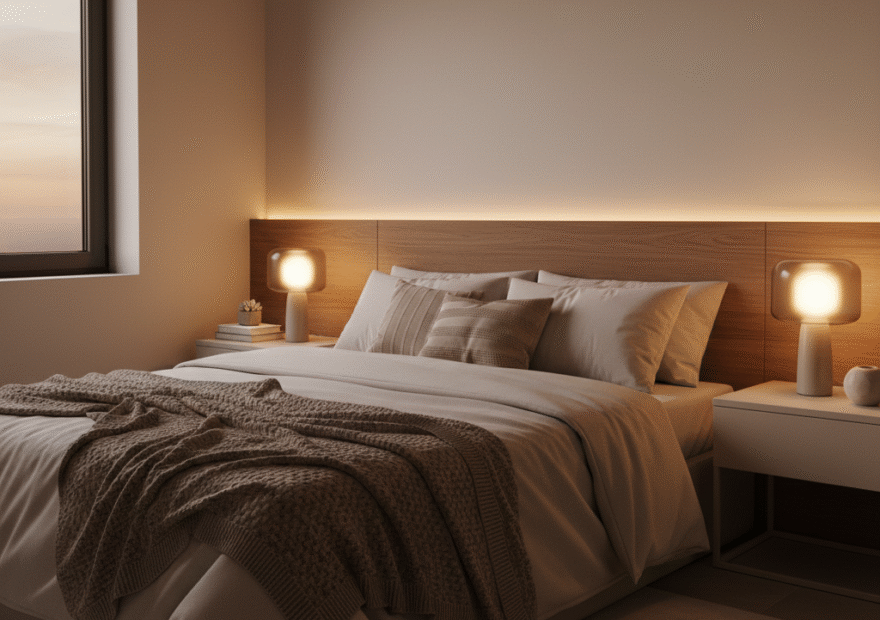
To transform your bedroom into a true place of rest, Morrow Homes recommends choosing lights with a power of 2700K to 3000K . This range is often referred to as “Warm White.”

Why does this work?

  • Mimics Nature: This temperature closely resembles the soft, natural light of a setting sun . As the sun sets, the light becomes warmer, signaling to our biological clocks that it is time to wind down.

  • Mental Relaxation: Warm light provides a soft glow that helps soothe the mind and relax the body after a long day.

  • Aesthetic Appeal: Beyond health benefits, warm lighting enhances the textures of your furniture and decor, creating a cozy, high-end “boutique hotel” feel.

Creating a Layered Lighting Scheme

Following the advice from the experts at Morrow Homes, here are a few ways to implement these tips:

  1. Ditch the Tube Lights: Standard bright white tube lights are often too harsh. Swap them for warm LED recessed lights or stylish pendants.

  2. Use Bedside Lamps: Instead of one central bright light, use bedside lamps with 2700K bulbs for reading. This keeps the light levels low and focused.

  3. Accent Lighting: Use warm strips behind headboards or under wardrobes to create a soft ambient glow that doesn’t strain the eyes.

Conclusion

Small changes in your home’s architecture and interior design can lead to massive improvements in your quality of life. By simply switching your bedroom bulbs to a warmer temperature, you aren’t just changing a light; you’re investing in better health and better sleep.

For more expert architectural tips and home transformation ideas, be sure to follow Morrow Homes and stay tuned for more insights on building your dream home.

Watch the full tip here: https://www.youtube.com/watch?v=ne-LAnWJ4Dg

Understanding Foundation Footings: A Guide to Building a Stable Home

When constructing a building, the foundation is arguably the most critical component. It ensures that the weight of the entire structure is safely distributed to the ground. Choosing the right type of footing depends on the soil quality, the type of structure, and the terrain.

In this guide, we break down the different types of footings as explained by Morrow Homes to help you understand which one suits your construction needs.

1. Wall Footing

Wall footings are used to distribute the load from the walls evenly to the soil below. This type of footing is essential for providing overall stability to the building and preventing uneven settlement

2. Spread Footing

As the name suggests, this footing “spreads” the load over a wider area. By increasing the width of the footing, the weight of the building is distributed more effectively. This is particularly helpful in preventing the building from leaning or sinking on one side

3. Raft Footing (Mat Foundation)

Raft footings are the preferred choice in areas where the soil has low bearing capacity (weak soil). It acts like a “raft” that allows the entire weight of the building to be distributed uniformly across the whole footprint of the foundation

4. Pile Footing

When the surface soil is too weak to support the weight of a structure, engineers look deeper. Pile footings involve driving columns deep into the earth to reach a stronger soil layer or rock, transferring the load to a more stable depth

5. Sloped Footing

Sloped footings are specifically designed for construction on inclined or sloped surfaces. They help maintain structural integrity while adapting to the natural gradient of the land

6. Stepped Footing

Stepped footings are primarily used when building on uneven or hilly terrain. Instead of a continuous flat base, the foundation is built in “steps” to follow the ground’s elevation changes while keeping the structure level.


Conclusion The longevity of your home depends on the ground it stands on. Whether you are building on a flat plot or a hillside, choosing the right footing is the first step toward a safe and durable home.

Ready to transform your exterior into a masterpiece?

Exterior Elegance: Transforming Facades into Statements

In the world of architecture, the exterior of a building is more than just a protective shell—it’s the first chapter of your home’s story. At Morrow Homes, we believe that exceptional exterior design goes beyond aesthetics; it’s about creating a harmonious dialogue between structure, environment, and individual style.

Modern Exterior Design: Beyond Conventional Boundaries

Today’s exterior design transcends traditional limitations. We’re seeing a fascinating blend of materials, textures, and innovative architectural approaches that challenge conventional thinking. From sleek minimalist designs to organic, nature-inspired facades, exterior architecture has become a canvas of personal expression.

Key Trends in Exterior Design:

  1. Sustainable Materials Eco-friendly materials are no longer a trend—they’re a necessity. Recycled wood, sustainable composites, and energy-efficient cladding are revolutionizing how we think about building exteriors.
  2. Seamless Indoor-Outdoor Integration Modern exteriors are breaking down barriers between interior and exterior spaces. Large glass panels, sliding doors, and strategic landscaping create fluid, interconnected environments.
  3. Texture and Contrast Mixing materials like wood, stone, metal, and glass creates visual depth and architectural interest. The interplay of rough and smooth textures adds complexity to your home’s exterior.
  4. Minimalist Color Palettes Neutral tones with strategic bold accents are dominating exterior color schemes. Think sophisticated grays, warm whites, and occasional dramatic black or deep green elements.
  5. Smart Technology Integration Exterior design now incorporates smart home technologies—automated lighting, solar panels, and adaptive shading systems that enhance both functionality and aesthetic appeal.

Challenges in Exterior Design:

  • Balancing aesthetics with functionality
  • Adapting to local climate and environmental conditions
  • Maintaining architectural integrity while incorporating modern technologies
  • Creating a unique identity that reflects the homeowner’s personality

The Morrow Homes Approach:

Our exterior design philosophy is rooted in:

  • Personalized consultation
  • Innovative design solutions
  • Sustainable practices
  • Attention to contextual details
  • Seamless integration of client vision

Practical Tips for Exterior Transformation:

  1. Consider your environment and local architectural context
  2. Prioritize quality materials over temporary trends
  3. Think about long-term maintenance
  4. Balance aesthetic desires with functional requirements
  5. Invest in professional design consultation
Conclusion

Your home’s exterior is more than a facade—it’s a statement, a personal signature that speaks volumes before anyone steps inside. At Morrow Homes, we don’t just design exteriors; we craft experiences, memories, and lifetime impressions.