Linear Drains vs. Traditional Drains: Why Your Bathroom Needs a Modern Upgrade

When designing a dream home, we often focus on the big elements—the tiles, the vanity, and the shower fixtures. However, one of the most critical components for functionality and hygiene is often tucked away under your feet: the floor drain. If you’ve ever dealt with a flooded bathroom floor or a clogged drain, you know how vital a good drainage system is.

In modern architecture, especially in the evolving interior design landscape of Kerala, the Linear Drain has emerged as a superior alternative to the traditional round drain. Let’s break down the differences and why this upgrade is essential for your home.

The Limitations of Traditional Round Drains

For decades, circular drains have been the standard in most households. While they serve a purpose, they come with several inherent flaws:

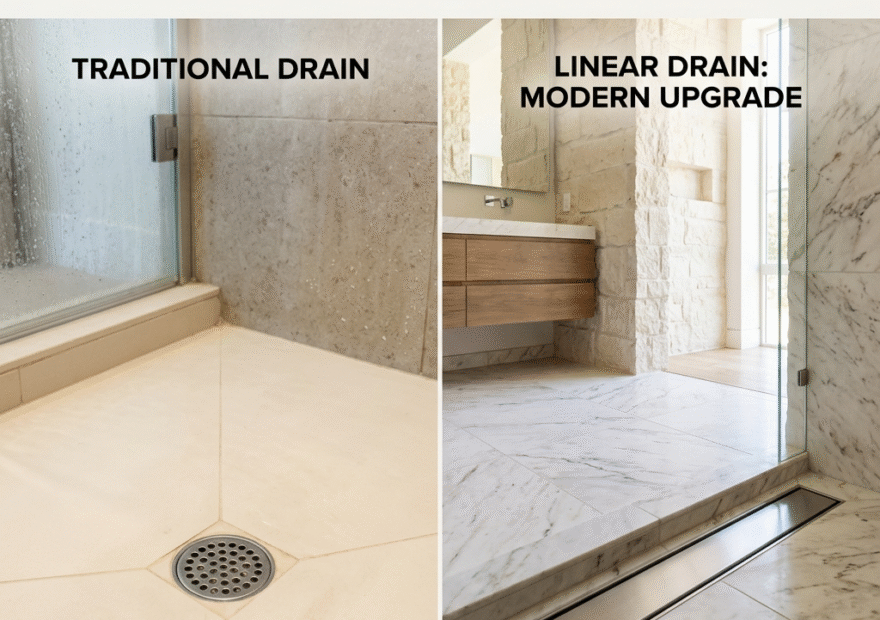
  • Slow Drainage: Because of their small surface area, round drains struggle to handle high water volumes . This often leads to “pooling,” where water sits on the bathroom floor for a long time before eventually draining.

  • Prone to Clogging: The small, concentrated opening of a round drain makes it a magnet for hair, soap scum, and debris . This leads to frequent blockages that require messy manual cleaning.

  • Design Restrictions: Installing a round drain requires the floor to be sloped from four directions (a “bowl” shape), which can be difficult with large-format tiles.

The Advantages of Linear Drains

As highlighted by Morrow Homes Kerala, linear drains are not just about aesthetics; they are built for efficiency.

1. Rapid Water Clearance The most significant benefit of a linear drain is its size. Its long, rectangular shape provides a much larger surface area compared to traditional drains. This allows water to flow out of the bathroom much faster, keeping your floors dry and slip-resistant .

2. Reduced Maintenance and Clogging Because the water and debris are distributed over a wider area, the likelihood of a total drainage block is significantly reduced. They are designed to be easily removed and cleaned, ensuring that your bathroom remains hygienic and odor-free.

3. Modern Aesthetic Appeal If you are aiming for a minimalist or luxury look, linear drains are the way to go. They offer a sleek, “invisible” appearance that blends seamlessly with your floor tiles. This is a favorite choice for top architects in Trivandrum and throughout Kerala who want to create a clean, unobstructed floor plane.

4. Ease of Tile Installation Unlike round drains that require complex four-way slopes, linear drains only require a single slope toward the drain. This means you can use large, beautiful floor tiles without having to cut them into awkward shapes to accommodate a center drain.

Final Verdict

Your bathroom is a place of relaxation. By choosing a linear drain, you are investing in a system that is efficient, easy to maintain, and visually stunning. For more expert home design tips and modern architectural solutions, be sure to follow Morrow Homes Kerala.

Watch the full video here: https://youtube.com/shorts/rpRJA-ChU50

Maximize Your Space: The Ultimate Guide to Jack and Jill Bathrooms

In the world of modern home design, space is the ultimate luxury. As we strive to build homes that are both functional and aesthetic, we often run into a common dilemma: how to provide enough bathrooms without sacrificing precious square footage.

Adding multiple attached bathrooms in a small house often leads to cramped bedrooms and wasted space. However, as highlighted by Morrow Homes, there is a brilliant solution to this problem: the Jack and Jill Bathroom.

What is a Jack and Jill Bathroom?

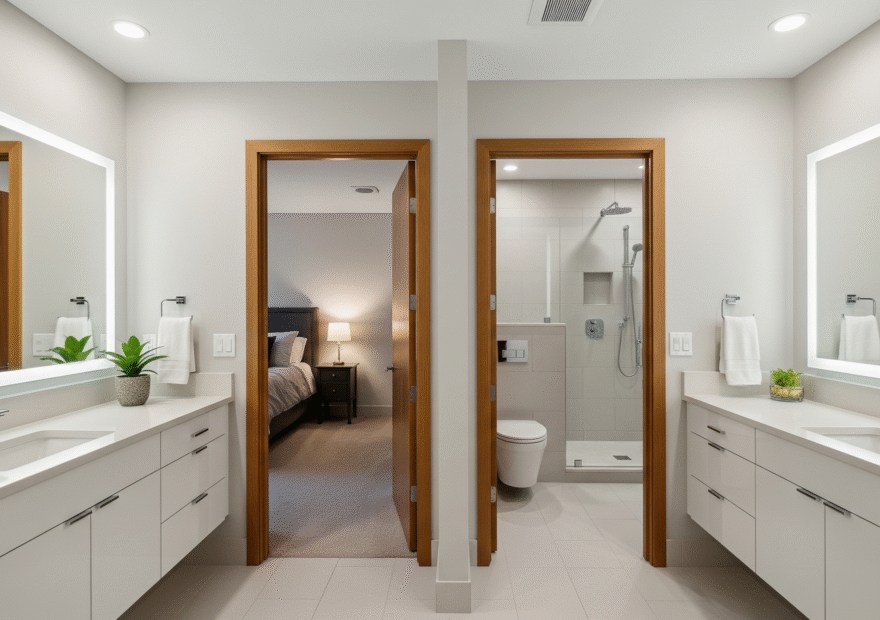
A Jack and Jill bathroom is a full-sized bathroom shared between two separate bedrooms. What makes it unique is that it features two entry doors, allowing residents from both rooms to access the facility directly.

It serves as a “bridge” between rooms, providing the convenience of an ensuite while functioning with the efficiency of a shared space. It’s an ideal setup for siblings, guest wings, or small families living in compact urban homes.

The Benefits of This Design

  1. Massive Space Savings: Instead of building two small, cramped bathrooms, you can invest in one large, high-quality Jack and Jill bathroom. This frees up floor area for larger wardrobes or study nooks in the bedrooms.

  2. Cost-Effective: Plumbing is one of the most expensive parts of home construction. By consolidating two bathrooms into one, you save significantly on piping, tiling, and fixtures.

  3. Increased Functionality: With the right layout, a shared bathroom can actually be more functional than two separate ones.

Solving the Privacy Challenge

The biggest concern with shared bathrooms is privacy. If one person leaves a door unlocked or open, it can lead to awkward situations. To ensure complete privacy and maximize utility, the video suggests a split-layout strategy:

1. Separate the Vanity Area

Instead of putting everything behind one door, place the vanity (washbasin) area in an outer section, with the toilet and shower tucked away in an inner compartment.

  • Why it works: This allows one person to brush their teeth or do their hair at the vanity while another person uses the shower in complete privacy. It effectively doubles the usability of the space.

2. Smart Door Choices

Standard swing doors take up a lot of “clearance space” when they open. To save even more room, consider:

  • Pocket Doors: These slide into a compartment in the wall, disappearing completely when open .

  • Sliding Doors: A sleek, modern alternative that keeps the floor area clear.

Essential Design Tips for your Jack and Jill Bathroom

If you are planning to incorporate this into your home, keep these points in mind:

  • Equal Access: Ensure the bathroom is placed centrally between the two rooms so neither occupant feels inconvenienced.

  • Dual Sinks: If space permits, a double vanity is a game-changer. It allows two people to get ready for school or work simultaneously without conflict.

  • Lighting and Ventilation: Since these bathrooms are often sandwiched between rooms, ensure you have high-quality exhaust fans and layered lighting (ambient and task lighting) to keep the space feeling bright and airy.

  • Neutral Decor: Since the bathroom is shared, choose a timeless, neutral color palette that complements both connecting bedrooms.

Conclusion

Building a dream home doesn’t always mean building a big home; it means building a smart home. By opting for a Jack and Jill layout, you can enjoy the luxury of a large, well-appointed bathroom without the footprint of two separate units.

As Morrow Homes points out, small adjustments like separating the vanity and using sliding doors can turn a simple shared bathroom into a highly efficient, private, and stylish feature of your home

Watch the full tip from Morrow Homes here: https://youtube.com/shorts/hYlminhoEAU

Mastering Your Home’s Electrical Layout: A Guide to Perfect Switch and Socket Placement

When building or renovating a home, it is easy to get caught up in the aesthetics—the flooring, paint colors, and cabinetry. However, the true functionality of your living space often comes down to the details you might overlook until it’s too late: the placement of your electrical switches and sockets.

Proper electrical planning is not just about convenience; it is a critical safety measure that ensures your home runs smoothly. In a recent video from Morrow Homes, experts shared essential tips for optimizing these placements to enhance both utility and safety.

The Kitchen: Prioritizing Convenience

The kitchen is the heart of the home and, naturally, the most equipment-heavy room. To ensure that your appliances—like mixers, toasters, and air fryers—are easy to use without tangled cords cluttering your workspace, pay close attention to your countertop sockets. The recommended height is at least 150mm above the countertop]. This specific elevation keeps sockets accessible while preventing them from being too close to the surface, where spills or moisture could pose a risk.

The Bedroom: Designed for Comfort

In the bedroom, the goal is effortless comfort. Your main switchboards should ideally be installed at a height of 1300mm from the floor. When it comes to the bedside, positioning your sockets near your nightstand at a height of 700mm is ideal. This placement allows you to charge your phone or plug in a lamp without needing to reach behind heavy furniture or scramble on the floor.

Safety and Aesthetics: The “Golden Rules”

Safety is paramount when mapping out your electrical points. A crucial rule often missed during construction is maintaining distance from door frames. You should always ensure there is a minimum gap of 150mm between a door frame and your switchboard . This not only adheres to safety standards but also prevents the switch from being awkwardly hidden behind the door when it is opened.

Finally, if you want a clean, minimalist look for your living room, consider the “hidden” approach for your entertainment area. By placing the primary TV sockets behind the television unit, you can eliminate unsightly wire tangles. These should be set between 1.2 meters to 1.3 meters from the floor, while auxiliary switches for the unit can be placed at a height of 500mm.

Final Thoughts

A well-planned home is one that anticipates your needs before you realize them. By taking the time to mark these heights during the construction phase, you save yourself the frustration of poorly placed outlets and ensure your home remains both functional and visually seamless.

For more expert advice on home construction and interior planning, follow Morrow Homes.

Illuminating Your Sanctuary: Why the Right Bedroom Lighting Matters

Your bedroom is more than just a place to sleep; it is your personal sanctuary, a space designed for relaxation, reflection, and rejuvenation. While we often spend hours picking out the perfect mattress or the softest linens, one of the most critical elements of bedroom design is frequently overlooked: lighting.

In a recent expert tip from Morrow Homes, a leading architectural firm in Kerala, the importance of Color Temperature (measured in Kelvin) was highlighted as a deciding factor in sleep quality and mental well-being. If you’ve been feeling restless or finding it hard to “switch off” at night, the culprit might be right above your head.

The Science of Light and Sleep

We  points out a common mistake many homeowners make: using high-intensity lights ranging from 4000K to 5000K in the bedroom These temperatures produce a “cool white” or “daylight” effect. While these are excellent for offices, kitchens, or workspaces where alertness is required, they are detrimental to a bedroom environment.

Cooler blue-toned lights suppress the production of melatonin, the hormone responsible for regulating your sleep-wake cycle. When your brain is exposed to 5000K lighting late at night, it receives a signal that it is still daytime, making it significantly harder to fall into a deep, restful slumber.

The Golden Rule: 2700K to 3000K

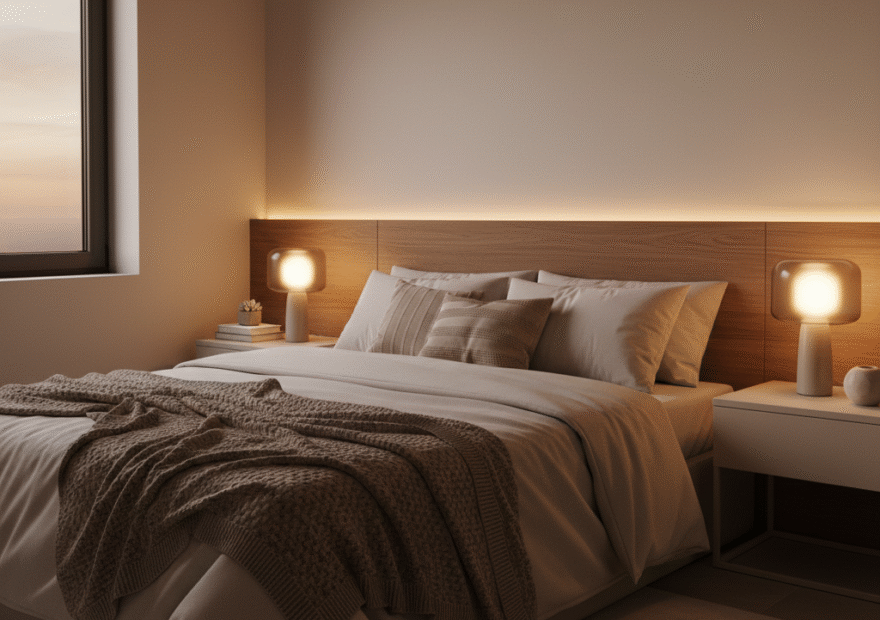
To transform your bedroom into a true place of rest, Morrow Homes recommends choosing lights with a power of 2700K to 3000K . This range is often referred to as “Warm White.”

Why does this work?

  • Mimics Nature: This temperature closely resembles the soft, natural light of a setting sun . As the sun sets, the light becomes warmer, signaling to our biological clocks that it is time to wind down.

  • Mental Relaxation: Warm light provides a soft glow that helps soothe the mind and relax the body after a long day.

  • Aesthetic Appeal: Beyond health benefits, warm lighting enhances the textures of your furniture and decor, creating a cozy, high-end “boutique hotel” feel.

Creating a Layered Lighting Scheme

Following the advice from the experts at Morrow Homes, here are a few ways to implement these tips:

  1. Ditch the Tube Lights: Standard bright white tube lights are often too harsh. Swap them for warm LED recessed lights or stylish pendants.

  2. Use Bedside Lamps: Instead of one central bright light, use bedside lamps with 2700K bulbs for reading. This keeps the light levels low and focused.

  3. Accent Lighting: Use warm strips behind headboards or under wardrobes to create a soft ambient glow that doesn’t strain the eyes.

Conclusion

Small changes in your home’s architecture and interior design can lead to massive improvements in your quality of life. By simply switching your bedroom bulbs to a warmer temperature, you aren’t just changing a light; you’re investing in better health and better sleep.

For more expert architectural tips and home transformation ideas, be sure to follow Morrow Homes and stay tuned for more insights on building your dream home.

Watch the full tip here: https://www.youtube.com/watch?v=ne-LAnWJ4Dg