The Art of Ergonomic Kitchen Design: A Guide to Perfect Measurements

Designing a kitchen is much more than choosing the right color palette or selecting high-end appliances. At its core, kitchen design is about functionality, efficiency, and—most importantly—ergonomics. If you are building a new home or planning a renovation, the measurements you choose for your cabinets and countertops will define how your kitchen feels to use every single day.

Whether you are a seasoned home chef or someone who enjoys a casual weekend bake, small adjustments in your kitchen layout can make a world of difference. Drawing from professional architectural standards, let’s break down the essential dimensions that create a comfortable, productive kitchen space.

The Foundation: Countertop Heights and Depths

The most critical aspect of any kitchen is the countertop. It is your primary workspace, where prep work, cooking, and plating happen.

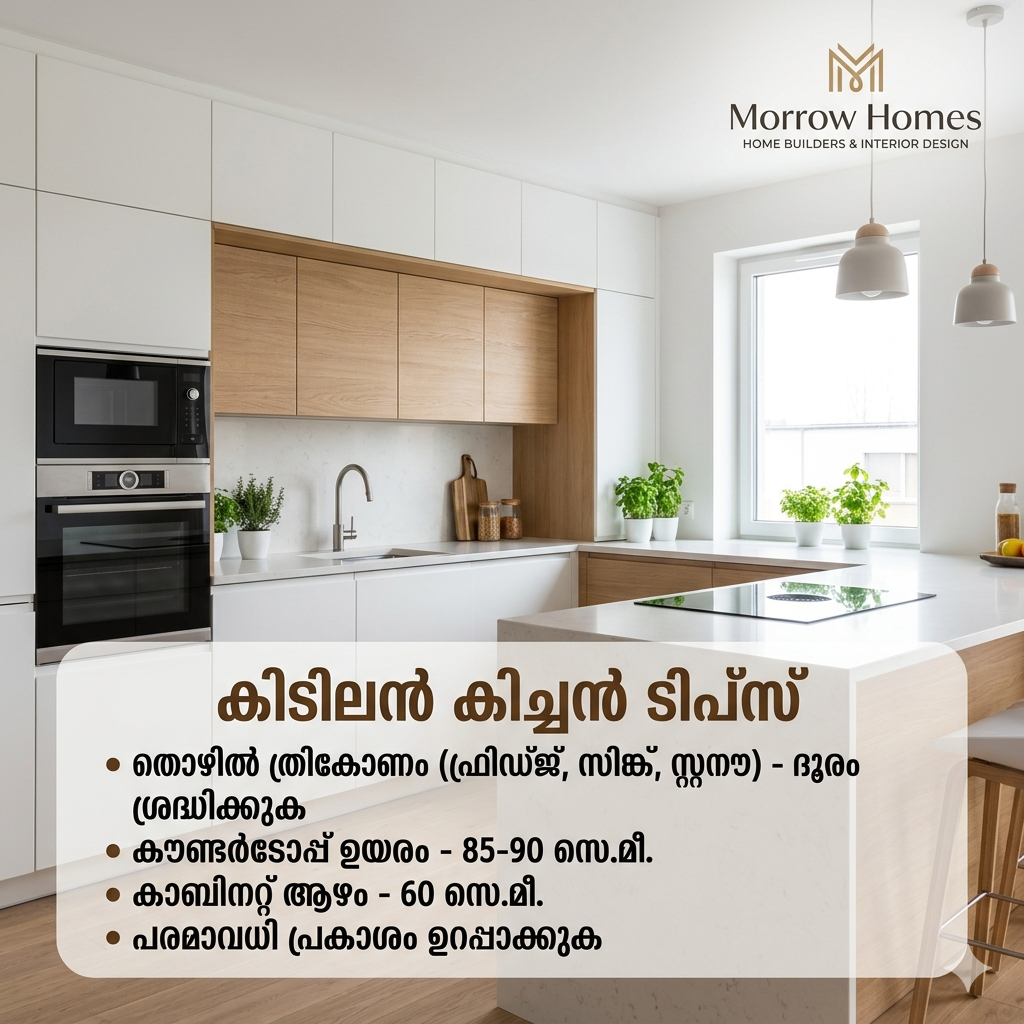
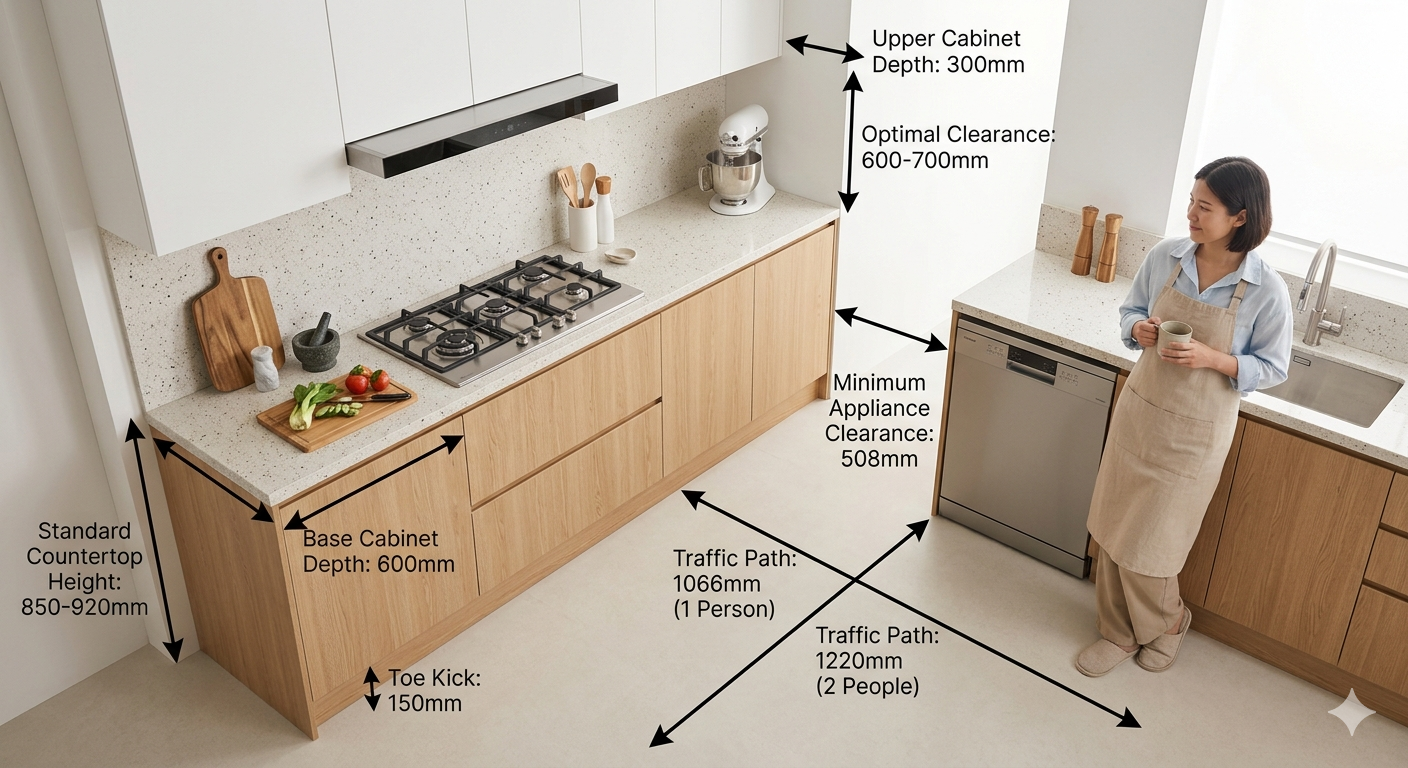
  • Countertop Height: To avoid back strain, your countertops should be set at an ergonomic height. The industry standard generally ranges between 850mm and 920mm. This height ensures that you are neither hunching over nor reaching too high while chopping vegetables or stirring a pot.

  • Cabinet Depth: The standard depth for a bottom cabinet is 600mm. This provides ample surface area for appliances and prep work while maintaining a reach that is comfortable for the average person.

  • Top Cabinet Proportions: For your overhead cabinets, a common design rule is to keep the depth at roughly half of your bottom cabinets—approximately 300mm. This ensures that the upper cabinets don’t feel intrusive or obstruct your view of the workspace below.

Mastering the Flow: Clearance and Spacing

A common mistake in kitchen design is failing to account for how people move through the space. A kitchen that looks beautiful on paper can be frustrating if it doesn’t allow for natural movement.

  • The Toe Kick: Don’t forget the base! It is essential to provide a 150mm toe kick space at the bottom of your lower cabinets. This allows your feet to fit comfortably under the counter while you stand, preventing you from having to lean forward awkwardly.

  • Spacing Between Cabinets: The gap between your base cabinets and your wall-mounted upper cabinets should be between 600mm and 700mm. This provides enough clearance to use countertop appliances (like mixers or coffee machines) without the upper cabinets feeling like they are “crowding” your workspace.

  • Traffic Flow: How much space do you actually need? For a single person working in the kitchen, 1066mm of space is generally recommended per person to move freely. If your kitchen layout often involves two people working simultaneously, aim for at least 1220mm of clearance to ensure you aren’t bumping into each other.

  • Walls and Breakfast Counters: If you have a wall or a breakfast counter, ensure a clearance of 1117mm. This prevents the area from feeling tight and allows for easy movement in and out of the kitchen zone.

Appliance Ergonomics: The Dishwasher Zone

Appliances are often integrated into our cabinetry, but they require their own specific spatial requirements to be truly useful. Take the dishwasher, for example. You aren’t just measuring the machine itself; you are measuring the space required to interact with it.

It is highly recommended to provide at least 508mm of open floor space in front of the dishwasher. This allows you to stand comfortably while loading or unloading dishes, maneuvering around the door without feeling trapped.

Why Measurements Matter

Kitchen design is essentially the science of human movement. By adhering to these standard measurements, you are not just building a set of cupboards; you are investing in a space that respects your posture, reduces fatigue, and streamlines your workflow.

If you are planning your dream kitchen, take the time to map out these dimensions before any construction begins. A well-measured kitchen is a joy to work in, turning the mundane task of cooking into a seamless, pleasurable experience.

For more architectural tips and professional advice on home construction, follow professional resources like Morrow Homes for insights into building spaces that are as functional as they are beautiful.

Watch Now: https://youtube.com/shorts/sgRV5BFEvtQ?feature=share

The Ultimate Guide to Designing a Child-Safe Home: Expert Tips from Morrow Homes

Building a home is about creating a sanctuary for your family, and when children are involved, safety becomes the cornerstone of design. At Morrow Homes, we believe that a child-safe home doesn’t have to compromise on modern aesthetics. By integrating safety into the architectural and interior planning stages, you can create a space that is both beautiful and secure for your little ones.

Here is our expert guide to designing a home that protects your most precious residents.


1. Smart Layouts and Visibility

The foundation of a child-safe home begins with a functional floor plan. Modern residential construction in Kerala is shifting toward open floor plans, which are not only great for ventilation but also allow parents to keep an eye on children from the kitchen or dining area.

  • Sightlines: Design your living spaces so there are clear lines of sight between high-traffic areas.

  • Safe Zones: Designate specific areas for play that are away from stairs or heavy kitchen equipment.

2. Flooring and Surface Safety

The materials you choose for your floors and counters play a huge role in preventing injuries.

  • Slip-Resistant Flooring: In areas prone to moisture, like bathrooms and kitchens, select matte-finish or anti-skid tiles to prevent falls.

  • Rounded Edges: When designing kitchen islands or custom cabinetry, opt for “bullnose” or rounded edges rather than sharp, 90-degree corners.

3. Electrical and Mechanical Security

As a leader in modern home building, Morrow Homes emphasizes the integration of smart technology for safety.

  • Tamper-Resistant Outlets: Install built-in safety shutters in your electrical outlets to prevent children from inserting objects.

  • Smart Automation: Use home automation systems to monitor smoke detectors and carbon monoxide levels directly from your smartphone.

  • Cordless Window Treatments: Opt for cordless blinds or motorized curtains to eliminate the risk of entanglement.

4. Staircase and Balcony Design

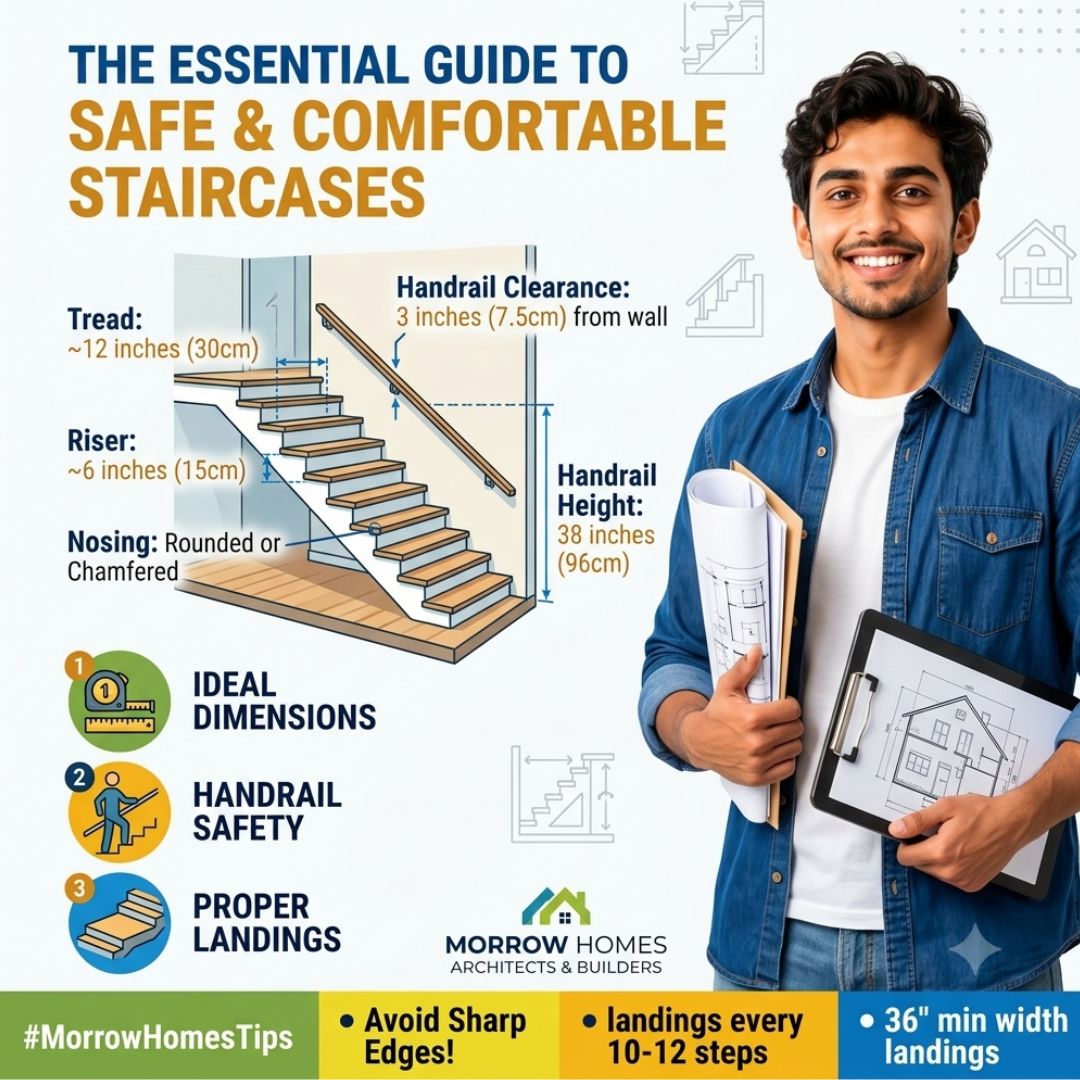
In multi-story residential projects, stairs and balconies require extra attention.

  • Balustrade Spacing: Ensure that the vertical bars on railings are spaced close enough together (typically no more than 4 inches) so a child cannot slip through.

  • Non-Slip Treads: Add subtle textured strips to wooden or stone stairs to provide extra grip for small feet.

5. Non-Toxic Material Selection

Quality control extends to the very air your family breathes. We recommend using Low-VOC (Volatile Organic Compounds) paints and finishes. These materials reduce the off-gassing of harmful chemicals, ensuring better indoor air quality for developing lungs.


Conclusion: Building with Care

Designing a child-safe home requires a blend of quality materials, smart technology, and thoughtful architecture. At Morrow Homes, we specialize in professional management and localized construction services in Trivandrum and Kochi, ensuring that your home is a safe haven for every generation.

Ready to build a home that puts your family’s safety first? Let’s start planning your dream project today.

View More: https://www.youtube.com/shorts/5rGw2xq4Eh8

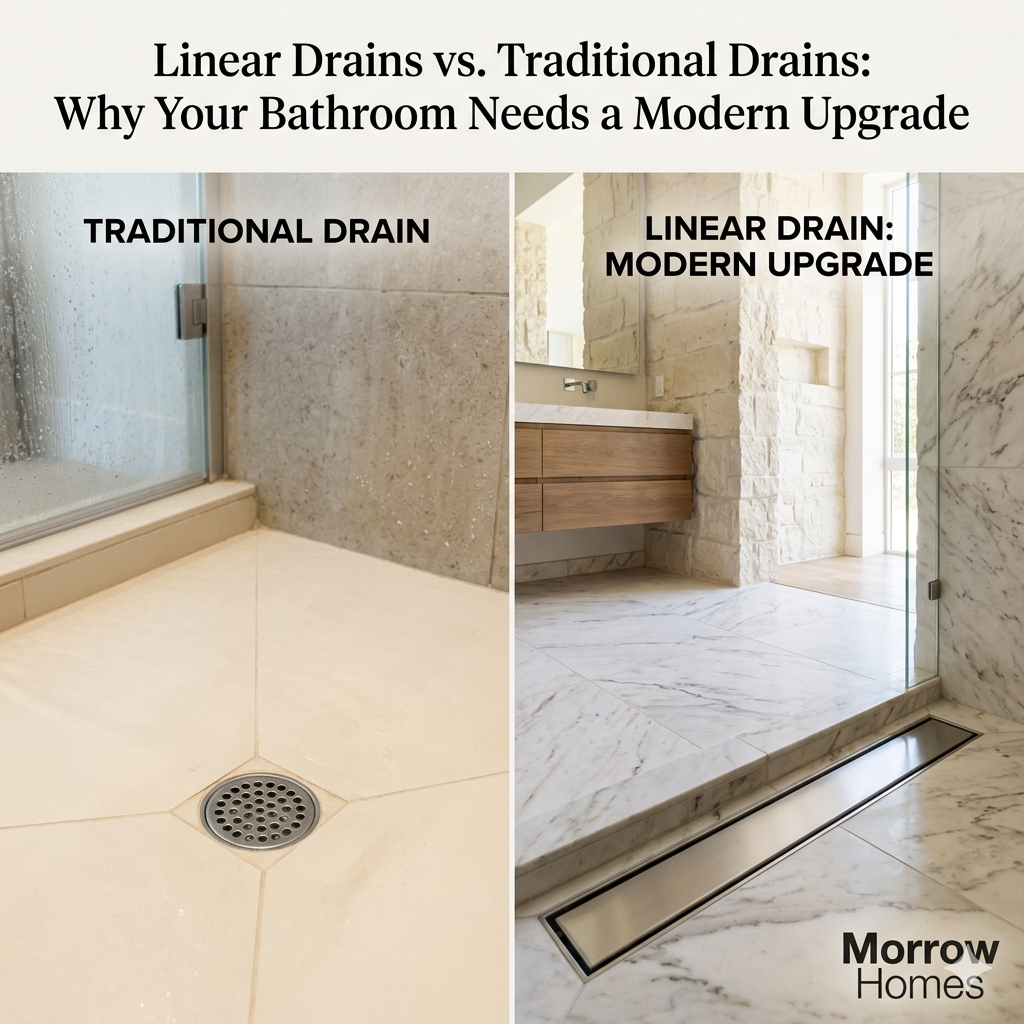
Linear Drains vs. Traditional Drains: Why Your Bathroom Needs a Modern Upgrade

When designing a dream home, we often focus on the big elements—the tiles, the vanity, and the shower fixtures. However, one of the most critical components for functionality and hygiene is often tucked away under your feet: the floor drain. If you’ve ever dealt with a flooded bathroom floor or a clogged drain, you know how vital a good drainage system is.

In modern architecture, especially in the evolving interior design landscape of Kerala, the Linear Drain has emerged as a superior alternative to the traditional round drain. Let’s break down the differences and why this upgrade is essential for your home.

The Limitations of Traditional Round Drains

For decades, circular drains have been the standard in most households. While they serve a purpose, they come with several inherent flaws:

  • Slow Drainage: Because of their small surface area, round drains struggle to handle high water volumes . This often leads to “pooling,” where water sits on the bathroom floor for a long time before eventually draining.

  • Prone to Clogging: The small, concentrated opening of a round drain makes it a magnet for hair, soap scum, and debris . This leads to frequent blockages that require messy manual cleaning.

  • Design Restrictions: Installing a round drain requires the floor to be sloped from four directions (a “bowl” shape), which can be difficult with large-format tiles.

The Advantages of Linear Drains

As highlighted by Morrow Homes Kerala, linear drains are not just about aesthetics; they are built for efficiency.

1. Rapid Water Clearance The most significant benefit of a linear drain is its size. Its long, rectangular shape provides a much larger surface area compared to traditional drains. This allows water to flow out of the bathroom much faster, keeping your floors dry and slip-resistant .

2. Reduced Maintenance and Clogging Because the water and debris are distributed over a wider area, the likelihood of a total drainage block is significantly reduced. They are designed to be easily removed and cleaned, ensuring that your bathroom remains hygienic and odor-free.

3. Modern Aesthetic Appeal If you are aiming for a minimalist or luxury look, linear drains are the way to go. They offer a sleek, “invisible” appearance that blends seamlessly with your floor tiles. This is a favorite choice for top architects in Trivandrum and throughout Kerala who want to create a clean, unobstructed floor plane.

4. Ease of Tile Installation Unlike round drains that require complex four-way slopes, linear drains only require a single slope toward the drain. This means you can use large, beautiful floor tiles without having to cut them into awkward shapes to accommodate a center drain.

Final Verdict

Your bathroom is a place of relaxation. By choosing a linear drain, you are investing in a system that is efficient, easy to maintain, and visually stunning. For more expert home design tips and modern architectural solutions, be sure to follow Morrow Homes Kerala.

Watch the full video here: https://youtube.com/shorts/rpRJA-ChU50

Transform Your Kitchen: The Simple Solution for Exposed Sink Pipes

The kitchen is often referred to as the heart of the home. It is where meals are prepared, memories are made, and family life unfolds. However, even the most beautifully designed kitchen can be let down by small, overlooked details. One of the most common eyesores in a kitchen is the exposed plumbing under the sink. While it might seem like a minor aesthetic issue, leaving your sink pipes open can lead to hygiene problems, wasted space, and an overall cluttered look.

In a recent video by Morrow Homes, a simple yet effective tip was shared to elevate both the functionality and beauty of your kitchen. Here is how you can transform that messy under-sink area into an organized, hygienic, and stylish space.

The Hidden Problems of Exposed Pipes

Most homeowners ignore the area under the sink until a leak occurs. However, keeping this area open and the pipes exposed presents several challenges:

  1. Unpleasant Odors: When sink pipes are left completely open to the kitchen environment, trapped food particles or stagnant water in the U-bend can emit foul smells . These odors can permeate your kitchen, making it an unpleasant place to cook and dine.

  2. Hygiene and Bacteria: Exposed damp pipes are a breeding ground for bacteria and mold. This can compromise the overall cleanliness of your kitchen, which is the last thing you want in a space where food is handled.

  3. Wasted Storage Space: The area under the sink is often “dead space.” Because of the irregular shape of the pipes, it’s hard to store items neatly, leading to a pile of cleaning supplies shoved into a dark corner.

The Simple Solution: Under-Sink Cabinets

The experts at Morrow Homes suggest a straightforward architectural fix: installing a dedicated cabinet to conceal the plumbing . By enclosing the pipes, you instantly create a cleaner look, but the benefits go beyond just aesthetics.

1. Removable Shelving for Easy Maintenance

One of the biggest concerns people have with boxing in pipes is access for repairs. The video recommends using removable shelves within the cabinet . This design choice ensures that if you ever have a leak or need to perform maintenance on the plumbing, you can simply slide the shelves out and reach the pipes without any hassle.

2. Maximizing Storage Potential

Once the pipes are concealed within a cabinet, that “dead space” becomes a functional storage unit. You can use this area to neatly organize:

  • Cleaning Supplies: Sprays, sponges, and detergents can be tucked away but kept within reach.

  • Heavy Items: The base of the cabinet is perfect for storing heavier kitchen essentials that you don’t use every day.

3. Improving Kitchen Hygiene

By enclosing the area, you create a barrier that helps contain odors and prevents dust and grime from accumulating directly on the pipes. It makes the floor area under the sink much easier to sweep and mop, contributing to a more sanitary kitchen environment .

Enhancing Beauty Through Small Changes

The takeaway from this tip is that you don’t need a massive, expensive renovation to make your kitchen feel “designer.” Sometimes, it’s about the small, smart changes that improve the flow and cleanliness of your home. By hiding your sink pipes behind a well-crafted cabinet, you increase the visual appeal of the room and ensure that every square inch of your kitchen is working for you

Conclusion

A clean, organized kitchen is a happy kitchen. Taking the time to address the clutter and hygiene issues caused by exposed pipes is a worthy investment for any homeowner. Whether you are building a new home or looking to upgrade your current space, consider the under-sink cabinet as an essential feature.

For more expert home design and architectural tips, you can follow Morrow Homes for creative solutions that make modern living easier and more beautiful.


Watch the full tip here: Morrow Homes – Kitchen Design Tip

Maximizing Your Home’s Potential: Creative Ways to Use the Space Under Your Stairs

In modern home design, every square inch counts. Whether you are building a new house in Kerala or renovating an older one, one of the most frequently overlooked areas is the under-stair space. Often relegated to being a dark corner for dusty suitcases or old newspapers, this small nook actually holds immense potential to enhance both the functionality and the aesthetic appeal of your home.

As highlighted in a recent guide by Morrow Homes, transforming this “dead space” into a purposeful zone can be a game-changer. Here is a deep dive into how you can reclaim that area and turn it into one of the most useful spots in your house.


1. The Stylish Powder Room

One of the most popular and value-adding ways to utilize the space under a staircase is by installing a powder room or a guest toilet. This is particularly useful in Kerala homes where hospitality is key, providing guests with a private space without them needing to enter the more personal areas of the house.

However, building a bathroom in such a tight spot requires precision. According to the experts at Morrow Homes, there are two non-negotiable measurements you must keep in mind:

  • Headroom Clearance: To ensure the space is comfortable and doesn’t feel claustrophobic, you should have a minimum height of 2030 mm (roughly 6.6 feet) inside the room. This allows an average adult to stand upright without fear of hitting the sloping ceiling.

  • Floor Space: You need to maintain at least 610 mm (about 2 feet) of clear space in front of the toilet fixture. This ensures there is enough legroom and space to move around comfortably.

Pro Tip: Use light-colored tiles, a large mirror, and clever LED lighting to make a small under-stair powder room feel much larger than it actually is.


2. The Compact Home Office (Work-from-Home Nook)

If a bathroom isn’t a priority for your layout, consider turning the area into a mini work station. With the rise of remote work and digital learning, having a dedicated “cloffice” (closet-office) is a huge advantage.

The slope of the stairs naturally creates a cozy, focused environment. You can install a floating desk to keep the floor clear, add some floating shelves for books, and ensure there’s a power outlet nearby for your laptop and lamp. It’s the perfect way to create a professional boundary within a shared living area.


3. A Smart Laundry Hub

Another practical solution is converting the space into a laundry or utility area. In many modern Kerala homes, homeowners prefer to keep the washing machine and cleaning supplies tucked away from the main kitchen or bathroom areas.

By fitting your washing machine under the stairs, you save valuable floor space elsewhere. You can even install custom cabinetry to hide the machine behind doors when it’s not in use, along with pull-out drawers for detergents, iron boxes, and laundry baskets.


4. Bespoke Storage and Display

If you prefer to keep things simple, custom-built storage is the way to go. Instead of a single dark cupboard, think about:

  • Pull-out Drawers: These are excellent for shoe storage, keeping your entryway organized and clutter-free.

  • Open Bookshelves: If your staircase is in the living room, turning the underside into a library adds a sophisticated, intellectual vibe to the decor.

  • Wine Rack or Coffee Bar: For those who love to entertain, this niche can be transformed into a stylish bar or a dedicated coffee station.


Why Small Details Matter

The key takeaway from the Morrow Homes guide is that efficiency is the soul of modern architecture. Whether you are working with architects in Trivandrum or planning a DIY renovation, focusing on these “hidden” spaces allows you to live more comfortably without necessarily increasing the footprint of your home.

By paying attention to technical details like height clearances and floor spacing, you ensure that your creative solution is not just beautiful, but also practical for daily use.

Looking for more home construction tips in Kerala? Small changes can lead to big transformations. Don’t let your under-stair space go to waste—turn it into a feature that adds character and value to your home today!

For more expert advice on home building and design, check out the full video by Morrow Homes here.

Maximize Your Space: The Ultimate Guide to Jack and Jill Bathrooms

In the world of modern home design, space is the ultimate luxury. As we strive to build homes that are both functional and aesthetic, we often run into a common dilemma: how to provide enough bathrooms without sacrificing precious square footage.

Adding multiple attached bathrooms in a small house often leads to cramped bedrooms and wasted space. However, as highlighted by Morrow Homes, there is a brilliant solution to this problem: the Jack and Jill Bathroom.

What is a Jack and Jill Bathroom?

A Jack and Jill bathroom is a full-sized bathroom shared between two separate bedrooms. What makes it unique is that it features two entry doors, allowing residents from both rooms to access the facility directly.

It serves as a “bridge” between rooms, providing the convenience of an ensuite while functioning with the efficiency of a shared space. It’s an ideal setup for siblings, guest wings, or small families living in compact urban homes.

The Benefits of This Design

  1. Massive Space Savings: Instead of building two small, cramped bathrooms, you can invest in one large, high-quality Jack and Jill bathroom. This frees up floor area for larger wardrobes or study nooks in the bedrooms.

  2. Cost-Effective: Plumbing is one of the most expensive parts of home construction. By consolidating two bathrooms into one, you save significantly on piping, tiling, and fixtures.

  3. Increased Functionality: With the right layout, a shared bathroom can actually be more functional than two separate ones.

Solving the Privacy Challenge

The biggest concern with shared bathrooms is privacy. If one person leaves a door unlocked or open, it can lead to awkward situations. To ensure complete privacy and maximize utility, the video suggests a split-layout strategy:

1. Separate the Vanity Area

Instead of putting everything behind one door, place the vanity (washbasin) area in an outer section, with the toilet and shower tucked away in an inner compartment.

  • Why it works: This allows one person to brush their teeth or do their hair at the vanity while another person uses the shower in complete privacy. It effectively doubles the usability of the space.

2. Smart Door Choices

Standard swing doors take up a lot of “clearance space” when they open. To save even more room, consider:

  • Pocket Doors: These slide into a compartment in the wall, disappearing completely when open .

  • Sliding Doors: A sleek, modern alternative that keeps the floor area clear.

Essential Design Tips for your Jack and Jill Bathroom

If you are planning to incorporate this into your home, keep these points in mind:

  • Equal Access: Ensure the bathroom is placed centrally between the two rooms so neither occupant feels inconvenienced.

  • Dual Sinks: If space permits, a double vanity is a game-changer. It allows two people to get ready for school or work simultaneously without conflict.

  • Lighting and Ventilation: Since these bathrooms are often sandwiched between rooms, ensure you have high-quality exhaust fans and layered lighting (ambient and task lighting) to keep the space feeling bright and airy.

  • Neutral Decor: Since the bathroom is shared, choose a timeless, neutral color palette that complements both connecting bedrooms.

Conclusion

Building a dream home doesn’t always mean building a big home; it means building a smart home. By opting for a Jack and Jill layout, you can enjoy the luxury of a large, well-appointed bathroom without the footprint of two separate units.

As Morrow Homes points out, small adjustments like separating the vanity and using sliding doors can turn a simple shared bathroom into a highly efficient, private, and stylish feature of your home

Watch the full tip from Morrow Homes here: https://youtube.com/shorts/hYlminhoEAU

Creating the Perfect Ergonomic Home Office: Tips for a Pain-Free Workspace

In the modern professional landscape, the home office has transitioned from a temporary setup to a permanent fixture in our lives. However, many of us overlook the physical toll that a poorly designed workspace can take on our bodies. Incorrect posture and improper furniture alignment are leading causes of chronic neck pain, backaches, and general physical fatigue.

To help you stay productive and healthy, here is a comprehensive guide to setting up an ergonomic home office that prioritizes your well-being.

1. Optimize Your Desk Space

The foundation of a good workstation is having enough room to move. One of the most common mistakes is a cramped desk area that restricts leg movement. To ensure comfort, there should be a clear space of 510 mm to 710 mm beneath your desk.This allows you to stretch and position your legs naturally, preventing stiffness during long hours of work.

2. Perfect Your Seating Height

Your chair is perhaps the most critical element of your setup. A chair that is too high or too low can put undue pressure on your spine and thighs. Ideally, your chair height should be adjusted between 355 mm and 457 mm. When sitting, pay close attention to your body’s angles: your hips and knees should remain at a 90-degree angle. This posture supports the natural curve of your spine and promotes better circulation.

3. Maintain Spinal Alignment

It is easy to find yourself slouching as the day progresses, but keeping your spine straight is essential for long-term health. Avoid leaning forward or hunching over your laptop. Sitting upright not only prevents back pain but also improves your focus and breathing.

4. Screen Placement and Eye Health

Eye strain is a frequent complaint for those working digitally. To protect your vision, the distance between your eyes and the screen should be approximately one arm’s length, or at least 510 mm.

Furthermore, the angle at which you view your monitor matters. Positioning your screen so that your viewing angle is between 15 to 20 degrees is considered the most suitable for reducing neck strain.  This ensures you aren’t constantly looking too far up or down, which can lead to cervical discomfort.

Conclusion

Investing a little time into the ergonomics of your home office can yield massive returns in terms of health and productivity. By following these specific measurements and posture tips, you can transform your workspace into a sanctuary of efficiency rather than a source of physical stress.

Remember, a healthy body is the most important tool in your professional toolkit. Start making these adjustments today to ensure a more comfortable and sustainable work-from-home experience.

Watch More: https://youtube.com/shorts/hHjqDxvnwWI?si=h2yOlizAfWlikmyh

Essential Measurements for a Stunning and Functional Living Room

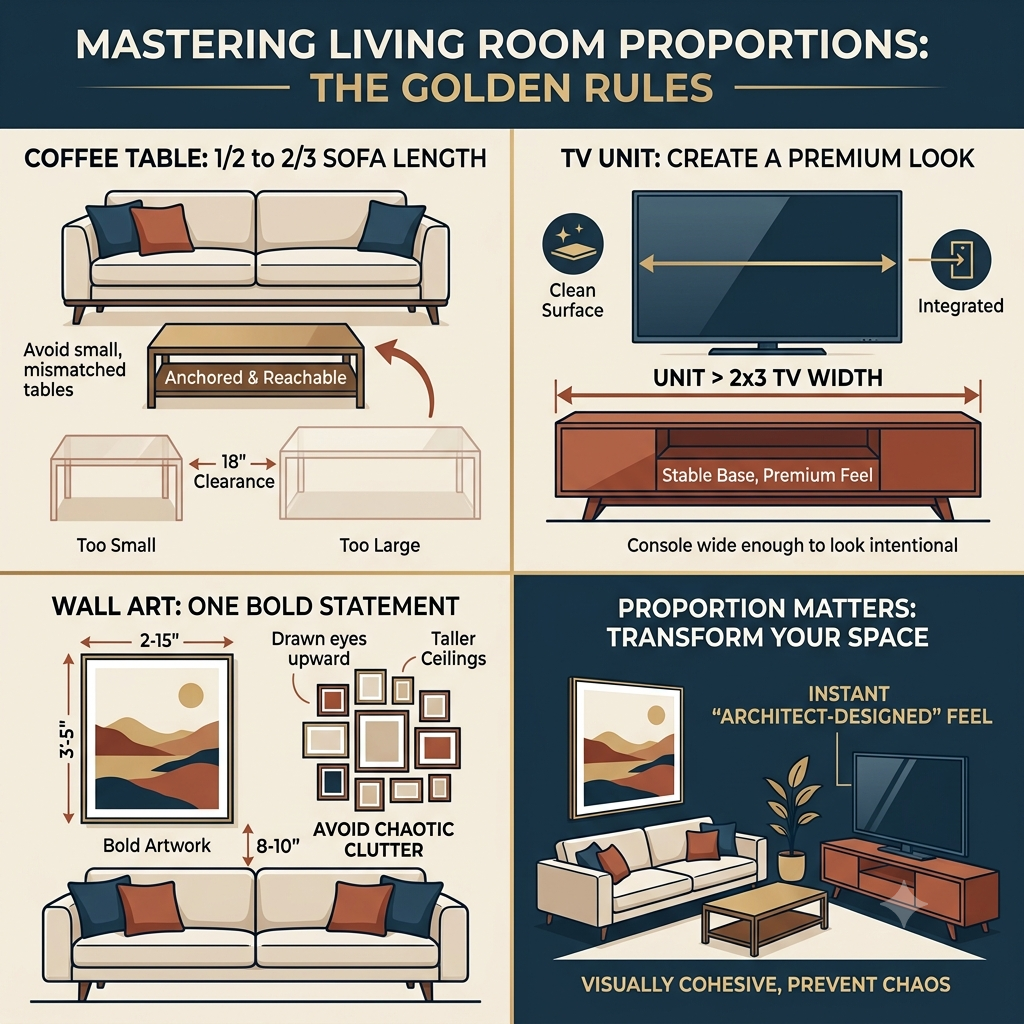
The living room is the heart of every home—a space where families gather, guests are entertained, and memories are made. However, a common mistake in home design is focusing solely on aesthetics while overlooking the science of ergonomics. Even the most expensive furniture can feel awkward if the spacing is off. To help you create a space that is both beautiful and comfortable, here are the essential measurements and layout tips for a perfect living room.

1. The Ideal Distance Between the Sofa and TV

One of the most important aspects of living room comfort is the viewing distance. If the sofa is too close, it can cause eye strain; if it’s too far, the cinematic experience is lost. A professional standard to follow is maintaining a distance of approximately 1.8 meters from the TV unit to the sofa. This provides a balanced field of vision and ensures that the screen remains the focal point without overwhelming the seating area [00:00].

2. Ensuring Seamless Traffic Flow

A well-designed room should never feel like an obstacle course. Whether you are carrying a tray of tea or simply moving through the house, “clearance” is key. It is highly recommended to leave at least 850 millimeters of walking space around furniture to ensure smooth movement within the room .

Additionally, pay close attention to the gap between your sofa and the coffee table. To prevent bumped shins while still keeping your drink within reach, aim for a minimum of 600 millimeters of space between the two .

3. Creating the Perfect Conversation Circle

Socializing is the primary function of a living room. If seats are spread too far apart, people end up shouting; too close, and it feels cramped. For a natural and comfortable conversation flow, position your primary seating within a range of 2.6 to 3 meters . This distance allows for intimate communication while maintaining a sense of personal space.

4. The Secret to Choosing the Right Carpet

The rug you choose can either “anchor” the room or make it look disjointed. A common design error is using a carpet that is too small for the space. Tiny rugs can make a large room look narrow and cluttered.

Instead, opt for a larger rug that allows at least the front legs of the sofa to rest upon it. Using a generous carpet that accommodates the furniture legs creates an illusion of a larger, more grand space, adding a touch of elegance and cohesion to the entire interior.

Conclusion

Designing a living room is about finding the perfect harmony between style and utility. By following these precise measurements—from the 1.8-meter TV distance to the 850mm walking paths—you can transform your home into a professional-grade living space. Remember, a room that is measured correctly doesn’t just look better; it feels better to live in.

For more expert home design and architectural tips, stay tuned for our latest updates and guides!

Watch the video: https://youtube.com/shorts/gXa3dXdW5k4?si=DxoLTVatGm_CIw2D

Essential Kitchen Design Tips: Avoiding Common Layout Mistakes for Your Dream Home

Designing a kitchen is one of the most critical aspects of building a home in Kerala. It is the heart of the household, where functionality must meet aesthetics. However, many homeowners and builders often fall into common traps that turn a beautiful kitchen into an impractical workspace.

Drawing insights from modern architectural standards, let’s look at how to avoid frequent kitchen design errors to ensure your space is both comfortable and efficient.

The Importance of the Kitchen Island Clearance

One of the most common mistakes in contemporary kitchen design involves the placement of the kitchen island. While an island provides extra counter space and a modern look, it can become an obstacle if not planned correctly.

A major error is leaving insufficient space between the island and the main kitchen counters. While some suggest a gap of 1.01 meters, this is often inadequate for a busy kitchen . For a truly functional space where two people can move past each other comfortably or where cabinet doors and appliances can open fully without obstruction, a minimum distance of 1.22 meters (approx. 4 feet) is highly recommended . This ensures that your movements are not restricted during peak cooking hours.

Optimizing the Kitchen Work Triangle

The “Work Triangle”—the path between the sink, the cooktop (hob), and the refrigerator—is the foundation of kitchen ergonomics. A frequent mistake is placing these elements in an illogical sequence or too far apart.

For instance, placing the sink at a great distance from the refrigerator makes the process of cleaning vegetables and prepping food incredibly tedious. Similarly, the hob should be positioned strategically so that it doesn’t interrupt the natural flow of movement. If these components are placed in the wrong order, you end up walking unnecessary laps around your kitchen, leading to fatigue and inefficiency.

Practical Tips for Kerala Homes

In the context of Kerala architecture, where kitchens often handle heavy-duty cooking, these measurements and placements are even more vital.

  1. Prioritize Flow: Ensure that the path from the fridge to the sink, and then to the stove, is unobstructed.

  2. Measure Twice: Before installing fixed islands, use tape on the floor to visualize the 1.22-meter clearance. Ensure you have enough “butt room” to work at the counter while someone else passes behind you.

  3. Lighting and Ventilation: While layout is key, remember that proper placement of the hob near ventilation is essential for Kerala’s spice-rich cooking style.

Conclusion

A well-designed kitchen is not just about expensive cabinetry or granite countertops; it’s about the science of space. By avoiding cramped island clearances and ensuring a logical work triangle, you can create a kitchen that is a joy to work in.

If you are planning your home construction in Trivandrum or across Kerala, paying attention to these small technical details during the design phase will save you years of inconvenience.

For more expert tips on home construction and architectural design, keeping up with modern standards and local expertise is the best way to ensure your dream home is perfect in every detail.

Watch the full tip here: https://youtube.com/shorts/tRzYhkm7i9s

Choosing the Perfect Bed: A Complete Guide to Bed Sizes for Your Bedroom

When designing a bedroom, the centerpiece is—without a doubt—the bed. However, beyond just comfort, the physical size of your bed plays a critical role in the functionality and “flow” of your room. Choosing the wrong size can make a spacious room feel cluttered or a compact room feel uncomfortably cramped.

Based on insights from industry experts like Morrow Homes, understanding the standard dimensions of beds is the first step toward creating a balanced living space. Whether you are renovating your home or planning an interior layout, here is a guide to choosing the right mattress size for your needs.

Common Bed Sizes and Their Dimensions

1. Twin Bed (99/203 cm) The twin bed is the most efficient choice for small bedrooms, guest rooms, or children’s rooms. Its slim profile allows for more floor space, making it ideal for compact living environments where every square centimeter counts.

2. Full/Double Bed (137/191 cm) This size offers a balance between space-saving and comfort for a single sleeper who prefers extra room, or for two people who need to be mindful of the room’s total square footage.

3. Queen Bed (152/203 cm) The Queen is arguably the most popular choice for couples. It provides a generous amount of width while still fitting comfortably in standard-sized primary bedrooms .

4. King/Eastern King Bed (193/203 cm) If luxury and maximum space are your priorities, the Eastern King is the way to go. Known for its expansive surface area, it is perfect for larger bedrooms where you want to emphasize comfort and indulgence.

Specialty and Unique Designs

5. Round Bed (244 cm Diameter) For those who want a unique, aesthetic statement piece, the round bed is an eye-catching option. However, as noted in recent design tips, while it looks visually stunning in a modern bedroom, practical maintenance can be a challenge. Finding fitted bedsheets or bedding that fits the circular shape can be difficult compared to standard rectangular beds.

6. California King Bed (183/213 cm) Taller sleepers often struggle with feet hanging off the edge of standard beds. The California King is the ultimate solution. While it is slightly narrower than the Eastern King, it compensates with significant extra length, ensuring that taller individuals can sleep soundly without compromise.

Why Measurements Matter

Before you purchase, consider the “circulation space”—the area left to walk around the bed. A general rule of thumb is to allow at least 60 to 90 centimeters of clearance on all sides of the bed to ensure the room doesn’t feel suffocating.

By measuring your room and selecting the appropriate bed type, you ensure that your bedroom remains a sanctuary of relaxation. For more tips on architectural planning and home design, stay tuned to professional home-building resources .

For more details watch the video here: https://www.youtube.com/shorts/yvqIMztZWfY